Hairstyle by Sanja Karasman
We wanted to create an earthy, natural feeling. Women are portrayed as sensual goddesses, full of grace and prestige. The palette of sophisticated nude tones creates the perfect surface that gives a spiritual feeling.
STYLE VARIATIONS


How WE achieved this look
0

Before
1

Separate square section as shown on the picture. Sections start at the cowlick, and end below the crown.
2
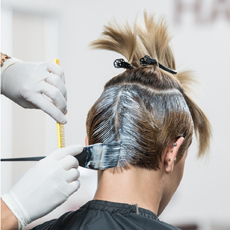
Use Formula A – ECHOES 6/71 + 8/71 + 5,5% ECD (1:1). Apply colour on the borders of top section. Start with colouring roots at the back of the head.
3
Once you‘ve coloured roots, apply colour on the ends at the bottom section.
4

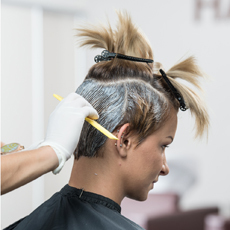
Move to the top. Separate the section in two parts, and start colouring roots. Make small horizontal sections, and lay them towards back.
5

When moving to the front of the head, make sure that the roots are equally coloured. Not more than 2 cm.
6

Once you‘ve finished with root application, lift the hair and use spatula for the next step.
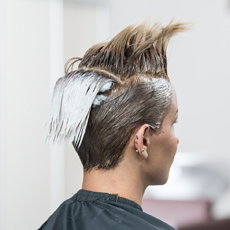
7

Separate fine horizontal sections. Lay them down on spatula and apply formula B – FREEHAND BLANC + 3% Cremeoxyd.
8

Apply product to the ends first. Then place brush vertically on the hair and draw lines towards roots, to blend the colours.
9
Place the coloured section down, and use cotton wool to keep ends and roots apart.
10

Separate sections and use cotton wool between every section to avoid staining.
11
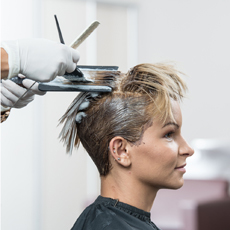
Keep moving forward. Split the sections in left and right to achieve equal separation of highlights all over the top.
12

At the front, make finer sections to blend the colour. Always place brush vertically on the hair.
13

Final look of colouring technique. Development time depends on what kind of colouring result you aim for. Make sure that the lightened hair reach level 10/0.
14

Wash the hair with ECHOES Colour Shampoo, toweldry the hair and apply Formula C on the lightened part. Formula C – SENSEO: 10/6 + 10/2 + 1,9% Cremeoxyd (1:2)
15

Leave colour to develop for 20 minutes. Wash the hair once with PHI After Colour Shampoo and then with PHI After Colour Mask.